Getting cracking
In my head, this instalment of my mini-series about my loft bedroom storage project is a montage, set to motivational music.
I would have to be played by one of those ‘interesting looking’ actors/actresses (I’m open to adaptations for the big screen version) who isn’t completely unattractive so doesn’t put audiences/studio executives off, but maintains some realism by looking like they probably have scoured Poundland for some cheap bolts.
As the first post in the #philsfrolicsloftproject series showed, it was time to get cracking on the work in the loft.
It kicked off with a trip to Homebase for some cladding (most economical I could find, and having inspected all 24 packs in store, I found the best two!) which I cut to length by hand.
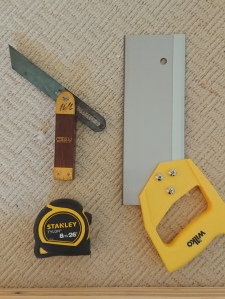
As part of the roof slopes away in the eaves, this was also my first chance to use a sliding bevel I’d picked up in a bundle of tools on eBay, and it went ridiculously well!
Each transferred angle was patiently hand sawn (have to go slow with my Wilko tenon saw, or it goes all over the place, but you get what you pay for!), then fitted before repeating for the next strip.
Once these had been prepped and had a couple of coats of paint (another two nights lost… tick tock, tick tock…) it was onto the biggest mental hurdle for me – cutting the cabinet carcass pieces!
I measured.
I re-measured.
I paused to think (with a brew), research, and check my cut list ‘one more time’.
I then persuaded myself that the plans were sound, and hit the timber merchants Hutchings Timber (brilliant place – I could spend all day in there!) to overload the car with MDF sheets, and three 10 foot planks I’d sifted out from amongst the split/twisted/knotted selection, strapped to the roof.
My scale drawing proved its worth here, as it confirmed I could get away with a shorter length for the top shelf because of the eaves, when I’d been unable to find a final longer one I was happy with, so the three longer ones were joined by a mere 8 footer.
Once I schlepped it all up two flights of stairs, I had a pile of material, some tools a pro wouldn’t use as doorstops, a sketch, and a blank canvass/blank wall to play with.
Time to get grafting (tick tock, tick tock…)
As I knew MDF is incredibly dusty to cut, I’d piled everything that lived up here normally into a corner and sheeted it all up. I knew I’d have to spend ages clearing up the mess in the uncovered area I was using, but it would be easier than working outside with kids, weather and staircases to contend with.
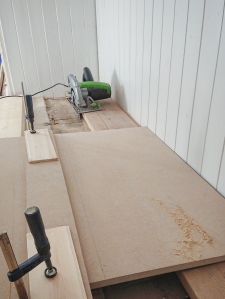
Masked up, I set up a guide for the circular saw to follow by clamping the presumably straight edge of one of the longer sheets of MDF on the piece I was cutting, and I tentatively made my first cut.
It was surprisingly successful – straight and the right size! It might not sound much, but one of my biggest fears was screwing these cuts up and it looking rubbish.
The same happened with the next. And the next, and the next!
In fact they all came out better than I expected.
It wasn’t quick (a track/rail saw would be much quicker and less stressful) as I had to re-measure and clamp my ‘guide’ in the right place, with the right width for the saw’s guard, each time, but I eventually had a respectable pile of the right sized pieces.
A bit of pre-drilling and screwing later, I had the two end carcasses assembled, which I then simply joined together with the lengths I’d already cut to form the middle section. Bafflingly – when you consider who calculated, measured and cut them – they were the right the right size!
I give the edges a coat with a PVA (thanks kids craft box!) and water mix to help seal them for a better finish later on, and rolled MDF sealer on the rest of the surfaces.
 This needed another night to dry (tick tock, tick tock…) so I couldn’t get a first coat or paint on until the next day, and I ended up putting three on to get a finish I was really rather pleased with (sanding lightly between each).
Tick tock, tick tock…
As the painting was taking time, I tried to get on with bits that would help later on, which invariably involved cutting something.
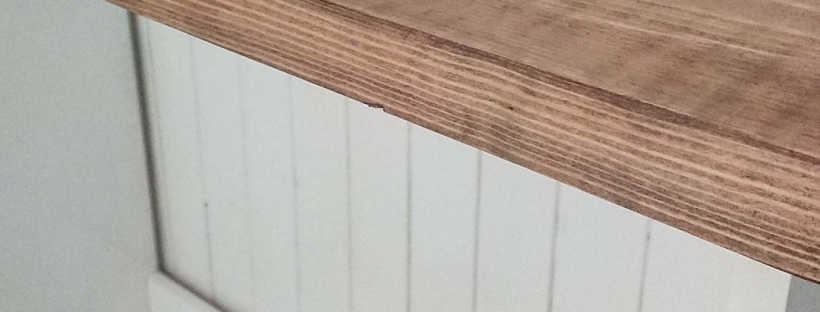
To avoid getting a sawdusty mess on wet paint, each painting session (when the previous coat was dry) was preceded by cutting things to length and sanding. The unit tops and shelves were finished with a wood dye and wax, which I’m actually quite pleased I tried as I’m quite fond of how it’s come out – making the grain pop a bit, and showing the saw marks from when it was milled.
A solution to the joist issue mentioned in the last post (lack of suitably positioned ones for the shelves above the cupboards) came to me one morning on the drive to work (seriously, this thing has been all-encompassing, I was thinking about some elements of it almost constantly!). A bit of lunchtime Googling helped reassure me my idea would work, and saw me ordering 10m of 24mm jute rope from eBay and spending the rest of the day hoping I hadn’t miscalculated the weight of two wooden planks…
Once the final coat of the main carcass was dry, I secured it to the wooden floorboard with a couple of right angle braces on each upright, attached the planks to the top and realised I’d made the bones of a cupboard unit!
 I’d used a small roller for the paint and I’m glad I did as the finish was a lot better than I’d worried about, and all the times I’d dismissed cutting corners to make it easier/quicker seem justified.
It was weird seeing something I’d been doodling, fretting and procrastinating over start to come to life, and actually not look bad.
It actually felt like I‘d broken the back of it as the bit I’d been worrying about the most – making the carcass, which I’d never done anything like before – was done, and it had worked!
I just had to make and hang six doors, put up a couple of long shelves and I was there!
Oh…
To be continued…
Frolics Footnote – I’ve linked to places where I got things for this project in this piece, but this is purely for information. I’m not recommending anything, I get nothing if you click on the links, and I got nothing – discounts, freebies, nor brown envelopes stuffed with cash – for using them. Sadly…

2 thoughts on “DIY cupboards and shelves – Part II”